[Windows] Implement In-App Purchase for Windows 10
You have an app that is truly awesome, with unique, compelling features. Users can’t take their eyes off your app. And you decide to make money from it. So you go read up on how to implement the In-App Purchase feature of Windows 10 and realize…it’s way too complicated. Let’s dive in together.
1. Official Documents
Microsoft has documentation for this, and even sample code, but it won’t help you at all. It’s all rather generic, hand-wavy and vague
- Enable In-App Purchase: https://msdn.microsoft.com/en-us/library/windows/apps/mt219684.aspx
- Enable consumable in-app product purchases: https://msdn.microsoft.com/en-us/library/windows/apps/mt219683.aspx
- Manage a large catalog of in-app products (Not really): https://msdn.microsoft.com/en-us/library/windows/apps/mt219686.aspx
Read every single word of those 3 documents and the amount of code you can actually write is extremely small. Hopefully this changes in the future. For now let’s try another way
2. Keywords
This section holds the keywords people usually mix up when implementing this feature
- Consumables: users can buy this type as many times as they want (typical examples are in-game currency, or 6 months of access to a library of books – music – blah blah blah)

Durables: users buy this type once and own it forever. For example a new level, a new stage, an item
ProductID: your product’s ID. This is the first setting when creating a new In-App Purchase in the Dev Center
3. The Un-official (yet worked) ways
3.1. Step 1: Publish your app to the Store
The first thing you want to do is publish your app to the Store.
“But the app is still in development, it can’t be published yet” – “The app has nothing in it” – “The app doesn’t have all its features finished”
That’s fine. The Store lets you publish your app while hiding it from search. Only people with a deep link (a link pointing directly to your app) can download and use it. That way you prevent users from finding your app and downloading it to enjoy things they were supposed to pay obamas for.
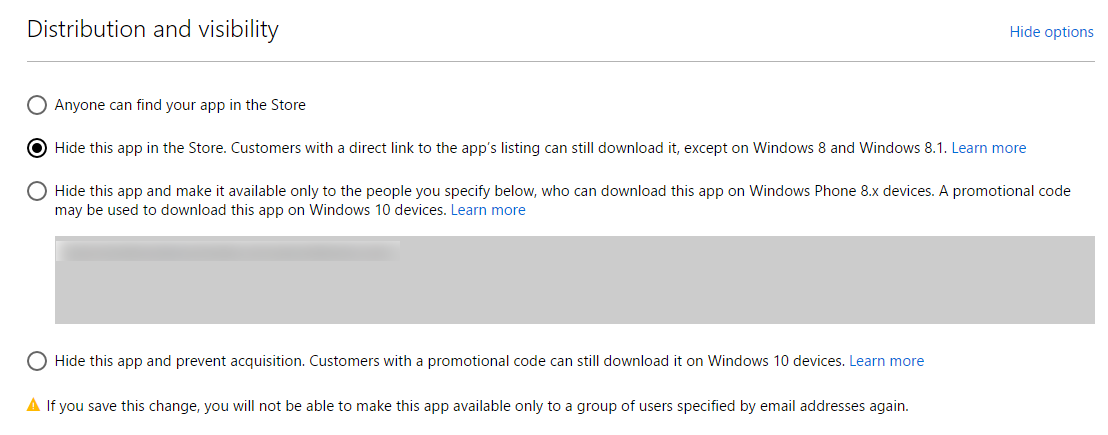
Hide this app in the Store
3.2. Step 2: Create IAP (aka In-App Purchase)
The In-App Purchase is completely separate from your app. And it also gets reviewed like an app, though that usually takes about an hour (way too slow). The steps for creating an In-App Purchase, like publishing an app, change over time. In short, just follow the on-screen instructions
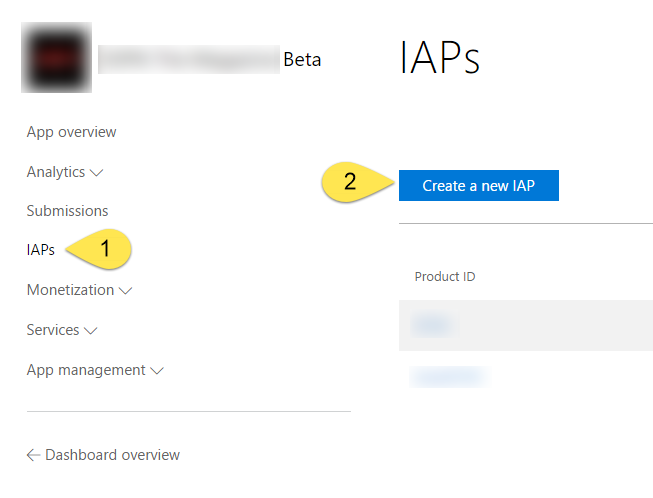
Creating an In-App Purchase
3.3. Step 3: The tricky
The In-App Purchase won’t work if either of the following is true
- The In-App Purchase was just created and you’re already rushing to test it before it went live
- There is no product on the In-App Purchase in the Dev Center
You’ll think: dead simple, just create the product on the In-App Purchase, wait an hour for it to go live, then go back into the app, switch to Release mode and you’re done. However
- Setting a Break-point on the lines related to the In-App Purchase shows no data
- Even with a product in place, nothing gets listed when displaying it on screen (count == 0)
And here is how. Note: follow exactly the order laid out in this blog post
3.3.1. Using CurrentAppSimulator
In your app’s constructor or data loading method, put the following code
StaticData.license = CurrentAppSimulator.LicenseInformation; StaticData.listings = await CurrentAppSimulator.LoadListingInformationAsync();StaticData is a class holding Static variables, reachable from every other class. Right after this code runs, Visual Studio creates a fake XML file at C:UsersAppDataLocalPackagesLocalStateMicrosoftWindows StoreApiDataWindowsStoreProxy.xml
Open it and change the following values
<App>
 <IsActive>true</IsActive>
 <IsTrial>false</IsTrial>
</App>
For the Product ID entry, change it to match the Product ID you set in the Dev Center
3.3.2. Showing the price (and other information) of the product
As you clearly saw, StaticData.listings holds all of your In-App Purchases. Every product is in there. So to attach a price to some product, besides having a template and a model, you’ll need to run a loop
foreach(KeyValuePair<string, ProductListing> productListing in StaticData.listings.ProductListings)
{
  if (productListing.Key.TrimStart('0') == issue.id)
  {
    issue.billing.price = productListing.Value.FormattedPrice;
  }
}
In the code above my Product ID is 0154 and issue.id is “154”. FormattedPrice includes the currency unit the system is using. You can also read other information like Description, Tag, and so on and so forth
3.3.3. Buying the In-App Purchase
Thanks to CurrentAppSimulator you can test purchases freely. Just tweak the values in the WindowsStoreProxy.xml file to test over and over. Basically the code for buying an item with an In-App Purchase looks like this
if (!StaticData.license.ProductLicenses[_selectedIssue.billing.iapKey].IsActive)
{
  try
  {
    // The user has never bought this
    // Show the purchase dialog
    await CurrentAppSimulator.RequestProductPurchaseAsync(_selectedIssue.billing.iapKey);

    //Check again whether the purchase succeeded
    if (StaticData.license.ProductLicenses[_selectedIssue.billing.iapKey].IsActive)
    {
      // If the purchase succeeded, do whatever
    }
  }
  catch(Exception)
  {
    // The purchase failed
    // an error occurred.
  }
}
else
{
  // Already bought this, carry on
}
And when testing, as this code runs, a small dialog shows up letting you simulate the cases that can happen in real use
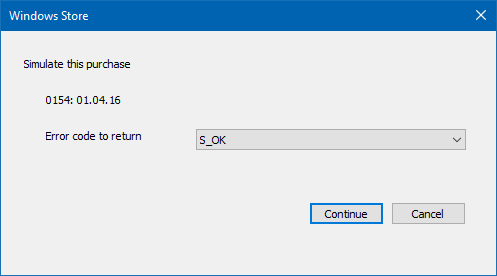
Looks good. On to the last step
3.4. Step 4: Change the test code to actual code
This step is fairly simple: just replace everywhere that uses CurrentAppSimulator with CurrentApp. Run the app once more and this time, when you hit buy, a real dialog shows up asking for your PIN to complete the purchase. Reaching this step counts as success

Tips: you should submit the In-App Purchase in the Dev Center 1-2 days ahead to make sure the real code will work (I once submitted, waited an hour for it to go live, then ran the real code and it reported that there were no in-app purchases in the dev center =.=)