[ASP.NET CORE] – My Road trip to ASP.NET Core – Building first API
Như vậy là các bạn đã bắt tay vào một project Asp.net core thật sự. Bài blog này sẽ hướng dẫn các bạn cách tự build một To-do list API đơn giản nhóe
- 1. Overview
- 2. Tools
- 3. Start
- 4. Routing và URL Paths
- 5. Return values
- 6. Triển thêm các phương thức CRUD khác
1. Overview
Nếu bạn chưa biết API là gì
API là viết tắt của cụm từ Application Programming Interface, là một dạng giao diện cho phép bạn tương tác với một dữ liệu nào đó.
Ví dụ như Uber chả hạn, bật app Uber lên, bạn sẽ thấy có vài xe Uber đang đậu quanh bạn. Làm sao Uber biết chuyện này? Bằng cách gửi tọa độ GPS của bạn lên server, và server sẽ trả về vị trí các xe đang rảnh xung quanh bạn. App Uber sẽ gắn nó lên trên bản đồ.
Đây sẽ là các API mà chúng ta sẽ build
| API | Description | Request body | Response body |
|---|---|---|---|
| GET /api/todo | Get all to-do items | None | Array of to-do items |
| GET /api/todo/{id} | Get an item by ID | None | To-do item |
| POST /api/todo | Add a new item | To-do item | To-do item |
| PUT /api/todo/{id} | Update an existing item | To-do item | None |
| DELETE /api/todo/{id} | Delete an item. | None | None |
Sơ đồ

Chú thích
View: app / web sẽ sử dụng API. Tạm thời chúng ta chưa quan tâm tới nó
Model: là kiểu dữ liệu của bạn. Trong ví dụ này, Model là To-do item
Controller: là thứ sẽ nhận HTTP Request, và tạo ra HTTP Responses. Ví dụ này sẽ chỉ có 1 controller duy nhất
Ví dụ này cũng không sử dụng Database, mà sẽ lưu trực tiếp trên bộ nhớ. Một API hoàn chỉnh sẽ có Database đi kèm nó
2. Tools
Đễ dễ dàng debug, test API do mình tạo ra, bạn có thể sử dụng một số phần mềm
2.1. Fiddler
Tải và cài đặt tại đây: https://www.telerik.com/download/fiddler
2.2. Google Chrome
Google Chrome thì khá tốt trong chuyện test tiếc các kiểu
3. Start
3.1. Khởi tạo Project
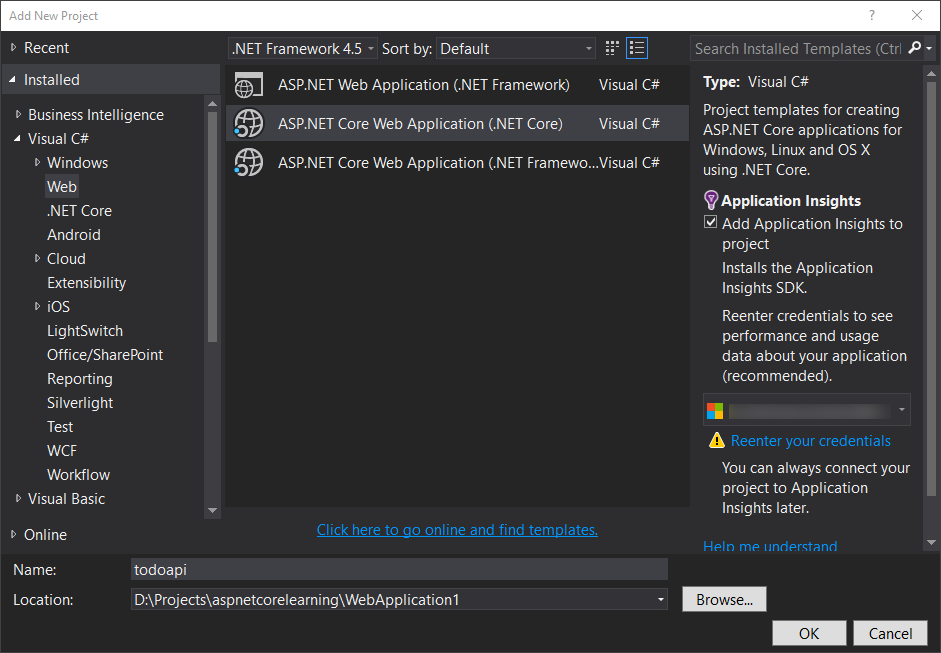
Tạo mới 1 project, chọn template là ASP.NET Core Web Application (.NET Core), đặt tên là todoapi > OK
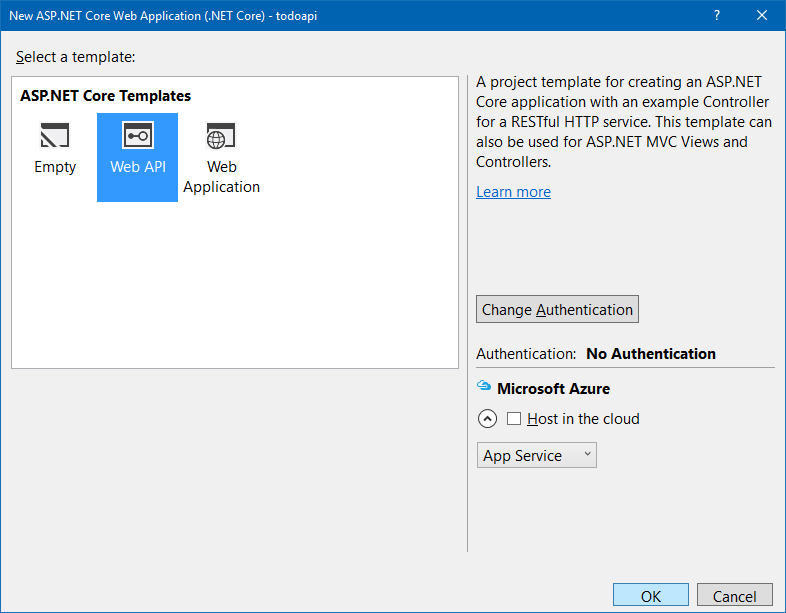
Chọn template là Web API > OK
3.2. Thêm model
Model là một object đại diện cho dữ liệu của bạn trong ứng dụng. Trong ví dụ này thì model duy nhất chỉ là một to-do item thôi.
Tips: bạn nên đặt toàn bộ model trong một folder riêng, tương tự với view và controller (đã có sẵn folder cho controller)
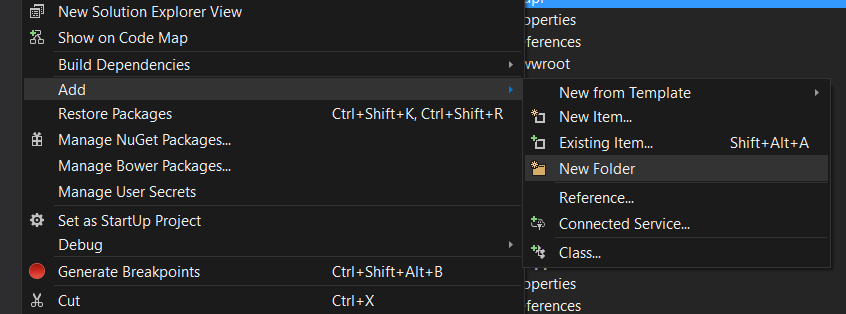
Chuột phải vào Project > Add > New Folder
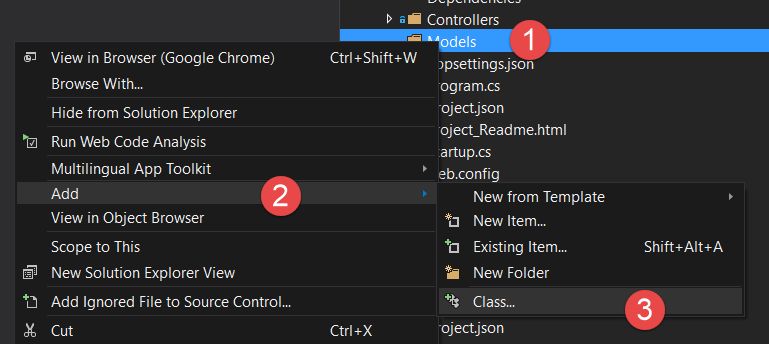
Tiếp tục chuột phải vào Folder Models > Add > Class, đặt tên class là TodoItem > Ok
Thêm 3 Property vô
public string Key { get; set; }
public string Name { get; set; }
public bool IsComplete { get; set; }
3.3. Thêm Repository
Repository, tiếng Việt là một chỗ lưu trữ cái gì đó, là một kỹ thuật mới tinh beng của ASP.NET core. Theo như tài liệu của họ, thì Repository dùng để đóng gói data, và chứa logic cho việc truy cập dữ liệu và chuyển nó qua cho Entity Model.
Mặc dù app của chúng ta ko có database, nhưng mà cũng hay nếu như bạn hiểu cái đám code này hoạt động dư lào
Để bắt đầu, chúng ta sẽ tạo một repository interface có tên ITodoRepository, dùng cách thêm class như trên, nhưng chọn template là Interface nhóe
namespace todoapi.Models
{
    public interface ITodoRepository
    {
        void Add(TodoItem item);
        IEnumerable<TodoItem> GetAll();
        TodoItem Find(string key);
        TodoItem Remove(string key);
        void Update(TodoItem item);
    }
}
Cái interface này định nghĩa các phương thức CRUD (Create - Read – Update – Delete)
Tiếp theo, ta thêm class TodoRepository, triển khai các phương thức trong Interface mới tạo bên trên
public class TodoRepository : ITodoRepository
{
    private static ConcurrentDictionary<string, TodoItem> _todos = new ConcurrentDictionary<string, TodoItem>();
    public TodoRepository()
    {
        Add(new TodoItem { Name = "Item1" });
    }

    public void Add(TodoItem item)
    {
        item.Key = Guid.NewGuid().ToString();
        _todos[item.Key] = item;
    }

    public IEnumerable<TodoItem> GetAll()
    {
        return _todos.Values;
    }

    public TodoItem Find(string key)
    {
        TodoItem item;
        _todos.TryGetValue(key, out item);
        return item;
    }

    public TodoItem Remove(string key)
    {
        TodoItem item;
        _todos.TryGetValue(key, out item);
        _todos.TryRemove(key, out item);
        return item;
    }

    public void Update(TodoItem item)
    {
        _todos[item.Key] = item;
    }
}
Xong xuôi thì build nó phát để coi có lỗi gì hok
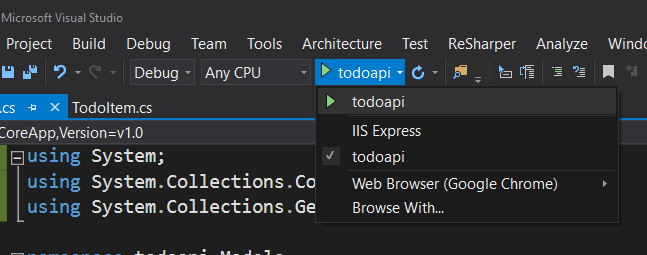
Build xong nó lên dư lày là okie
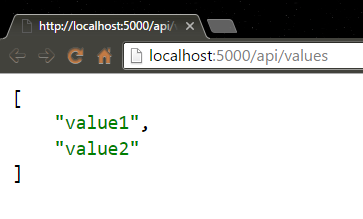
3.4. Register cái Repository
Bằng cách khai báo Interface repository, ta có thể tách biệt class repository ra khỏi controller xài nó. Thay vì tạo ra một instance của TodoRepository trong controller, ta có thể chọt cái ITodoRepository vào thẳng ASP.NET để sau này xài Depenency Injection (chưa biết nó là gì, tài liệu ở đây: https://docs.asp.net/en/latest/fundamentals/dependency-injection.html)
Cách này giúp bạn dễ dàng viết Unit Test hơn. Test sẽ thu hẹp lại xuống logic của controller, chứ không test cái truy xuất dữ liệu.
Để chọt (inject) nó vô controller, ta cần đăng ký nó. Mở file Startup.cs, thêm dòng sau vô đầu
using todoapi.Models;Trong phương thức configureServices, thêm đoạn code sau vô cuối
//Add our repository type
services.AddSingleton<ITodoRepository, TodoRepository>();
3.5. Thêm controller
Chuột phải lên thư mục Controller > Add > New Item
Chọn Web API Controller Class, đặt tên TodoController
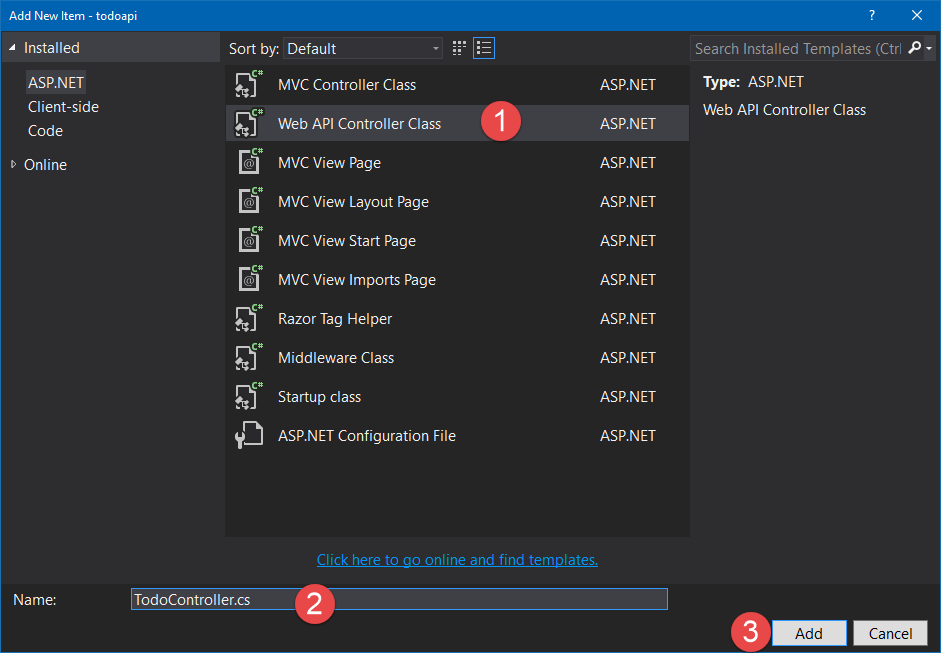
Xóa hết code trong class đi, thay bằng cái lày
public class TodoController : Controller
{
    public ITodoRepository TodoItems { get; set; }

    public TodoController(ITodoRepository todoItems)
    {
        TodoItems = todoItems;
    }
}
Như vậy là bạn đã khai báo một cái controller chả có gì bên trong cả. Trong các phần tiếp theo, chúng ta sẽ thêm các method để triển khai API nhóe.
3.6. Getting to-do items
Thêm method sau vào TodoController
public IEnumerable<TodoItem> GetAll()
{
return TodoItems.GetAll();
}
[]
public IActionResult GetById(string id)
{
var item = TodoItems.Find(id);
if (item == null)
{
return NotFound();
}
return new ObjectResult(item);
}Phương thức này có 2 cái get
- GET /api/todo
- GET /api/todo/{id}
Sau đây là một ví dụ cho HTTP Response khi gọi phương thức GetAll
HTTP/1.1 200 OK Content-Type: application/json; charset=utf-8 Server: Microsoft-IIS/10.0 Date: Thu, 18 Jun 2015 20:51:10 GMT Content-Length: 82
[{“Key”:”4f67d7c5-a2a9-4aae-b030-16003dd829ae”,”Name”:”Item1”,”IsComplete”:false}]
Sau này chúng ta sẽ dùng Fiddler để test các phương thức này nhóe
4. Routing và URL Paths
Trong cái phương thức trên, bạn sẽ thấy có [HttpGet]. Cái này gọi là Attribute, và Attribute này dùng để chỉ định phương thức cho method bên dưới là Get. Đường dẫn Url thì được xây dựng như sau
- Lấy cái string trong Controller’s Route: [Route(“api/[controller]”)]
- Bỏ cái [controller] ra, thay bằng tên của cái controller (tất nhiên là trừ đi chữ “Controller” nhóe). Ví dụ TodoController thì sẽ thay cái chữ Todo vô thôi
- Nếu mà HttpGet có template string, thì thêm cái string đó vô path. Cái ví dụ trên thì ko có
Trong cái phương thức GetId bên trên, “{id}” là một giá trị giữ chỗ. Khi request lên, client sẽ xài cái Id của TodoItem thế vô đó.
5. Return values
Phương thức GetAll trả về một kiểu dữ liệu là CLR Object. MVC tự động đổi nó thành JSON và viết JSON ra cái body của cái Reponse message. Reponse code sẽ là 200. Nếu có unhandled exception, reponse code sẽ là 5xx
- Nếu không có item nào có Id như răng, trả về reponse code 404. Cái này được định nghĩa bằng phương thức NotFound()
6. Triển thêm các phương thức CRUD khác
6.1. Create
[]
public IActionResult Create([FromBody] TodoItem item)
{
if (item == null)
{
return BadRequest();
}
TodoItems.Add(item);
return CreatedAtRoute("GetTodo", new {id = item.Key}, item);
}Phương thức Post
[FromBody] cho phép MVC biết là cái TodoItem đó lấy từ body của request message
Return CreatedAtRoute: sẽ trả về địa chỉ của cái item đấy luôn
6.2. Update
[]
public IActionResult Update(string id, [FromBody] TodoItem item)
{
if (item == null || item.Key != id)
{
return BadRequest();
}
var todo = TodoItems.Find(id);
if (todo == null)
{
return NotFound();
}
TodoItems.Update(item);
return new NoContentResult();
}Update cũng giống giống Create, nhưng mà xài HttpPut. Response chuẩn là 204 (No Content)
Theo như tài liệu của HTTP, thì Put request đòi hỏi client phải gửi toàn bộ nội dung của item cần update, chứ không phải vài thông tin rời rạc. Để update chỉ 1 thông tin nào đó, dùng HttpPatch
6.3. Delete
[]
public void Delete(string id)
{
TodoItems.Remove(id);
}Void trả về response là 204 (No Content). Tức là client sẽ nhận được 204 kể cả khi Item đã bị delete hay item ko tồn tại
Vậy là xong rồi, chờ bài post tiếp theo nhóe bạn