[ASP.NET Identity] - 1 - Introduction
One of the most mysterious things when building websites with ASP.NET is the ASP.NET Identity system, also developed by Microsoft. With quite a lot of hardcoding, plus many complex requirements around users and roles, Identity has bloated to an unbelievable size and is a tough bone to chew for anyone new to ASP.NET
1. How it evolved
1.1. Asp.net Membership
Back around the year 2000, there was a clear need for websites with sign-in, member registration and all that. MS saw it, jumped in, and ASP.NET Membership was born
This version was extremely limited + the DB was designed for SQL Server and couldn’t be changed + although the providers were designed to be swappable, mountains of hardcoding + developers’ assumption that SQL Server was mandatory made swapping them extremely painful + it couldn’t use OWIN
1.2. Asp.net Simple Membership
By 2010, when WebMatrix was popular, MS immediately shipped a trimmed-down / upgraded version of Membership, but in short it still had too many problems
1.3. ASP.NET Universal Providers
When Azure arrived, MS still wouldn’t give up the Membership platform and released the Universal Providers version (a fancy name)
Since it shared the same architectural foundation, all the earlier mistakes stayed exactly as they were
1.4. Asp.net Identity
After far too much feedback, the asp.net team shipped this version, fixing the limitations above.
- Can be shared across many Frameworks (MVC, Forms, Web Pages, Web API, SingalR)
- Easy to add fields to the user profile
- Can plug in Storage other than SQL Server (a bit less suffering)
- Unit testable
- Uses claims (explained later)
- Good OWIN support
- Supports Azure Active Directory
- Installable via Nuget
Let’s dive in
2. Getting started with ASP.NET Identity
See the code here: ASP.NET Identity 2 clone on GitHub
To understand it better, create a Sample Project with ASP.NET and pick Individual for Identity. File > New > Project…
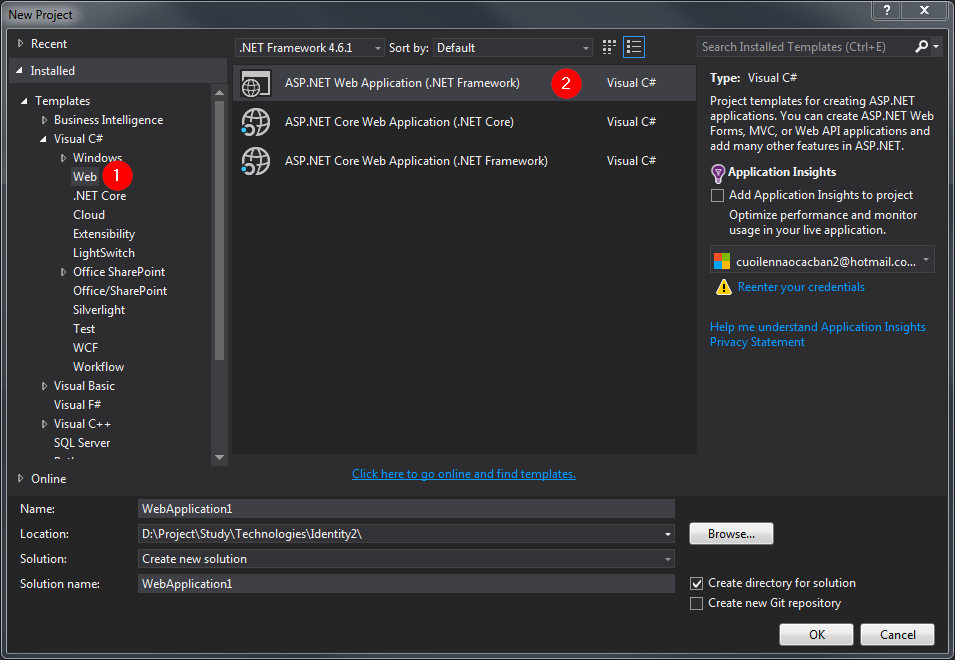
Right after it’s created you can hit run immediately
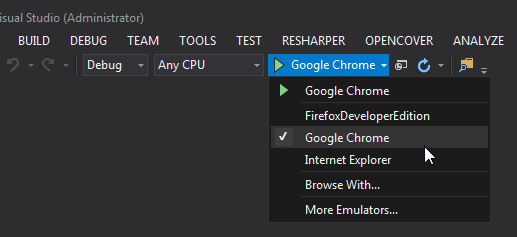
3. Break-down
Now let’s look at Identity piece by piece
3.1. Database
3.1.1. Connecting to the database
By default Identity uses a connection string named “DefaultConnection”. Open Models/IdentityModels
public class ApplicationDbContext : IdentityDbContext<ApplicationUser>
{
    public ApplicationDbContext() : base("DefaultConnection", throwIfV1Schema: false)
    {
    }

    public static ApplicationDbContext Create()
    {
        return new ApplicationDbContext();
    }
}
Open Web.config, look for DefaultConnection and you’ll see its connection string pointing at the Database
<connectionStrings>
  <add name="DefaultConnection"
       connectionString="Data Source=(LocalDb)\\MSSQLLocalDB;AttachDbFilename=|DataDirectory|\\aspnet-LearnIdentity2-20170824112720.mdf;Initial Catalog=aspnet-LearnIdentity2-20170824112720;Integrated Security=True"
       providerName="System.Data.SqlClient" />
</connectionStrings>
So Identity, depending on the framework you use, uses LocalDb or SQL Server. Connect to this db with SQL Server Management Studio and you’ll see it sitting right there
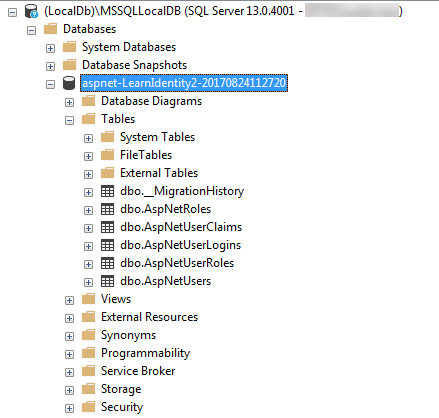
So do you wonder how Identity managed to create a database just from running the project?
3.1.2. Code first
To answer that question: since EF4, MS introduced a completely new approach called Code first, alongside the traditional Database First approach we’ve always had. With this approach the Dev only focuses on their code, and the db is created by EF to match the dev’s code
A basic flow is: the Dev writes the models and classes -> hits F5 -> EF creates / maps the database -> the app starts up with the created / mapped database
3.1.3. The structure
Identity creates 5 tables in the DB, and each table is related to the others
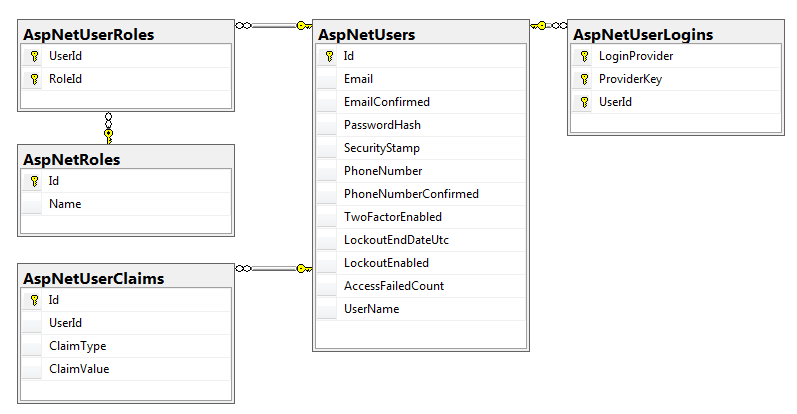
All the Id columns use nvarchar(128) and store GUID codes
3.2. Architecture and concepts
3.2.1. AspNetUsers
PasswordHash
Identity doesn’t store the password directly as plain text (so that if your Db gets hacked, the hacker still doesn’t know the password) ASP.NETIdentty2/src/Microsoft.AspNet.Identity.Core/Crypto.cs
Identity hashes your password using a 128 bit salt string. Generally you don’t need to worry about the encryption algorithm :D
In Identity Core this algorithm changed, so converting from Identity 2 to 3 needs a bit of reconfiguration
SecurityStamp
Basically, the SecurityStamp is used to validate a request. Say you change your password on this machine while another machine still holds the cookie: as soon as the password changes, the SecurityStamp changes and the cookies on all the other machines become invalid
3.2.2. AspNetUserLogins
This table is responsible for logging in with third-party service accounts like Google, Facebook, Twitter, and so on
LoginProvider
The name of the Service used to log in (for example “Facebook”, “Google”)
ProviderKey
A unique key the service gives you; this key is tied to your account at that service
All 3 of these fields together form the primary key. Which means 1 user can sign in through several different services
This table lets Identity use OWIN
3.2.3. AspNetUserClaims
A claim is an act where some subject states something about itself or about other subjects.
Example: User A claims that A has the right to view images
Claim-base Security Identity supports 2 kinds of Security: Role-base Security and Claim-base Security. Role-base security is covered later in this blog post
A real-world example
Claim-base Security is all around us. A real-world example is flying. To fly you have to bring your ID/Passport + your plane ticket:
Authentication: the checkpoint staff compare your face with your ID/PassportAuthorization: the staff check your ticket to see whether it’s genuine, which row and which seat, and finally issue you a boarding pass. So this boarding pass holds quite a lot of information: flight number, seat, passenger name, and often a black magnetic strip on the back holding the encrypted code of that boarding pass to prove it is a real boarding pass and not a fake. This boarding pass is exactly a set ofclaims, issued by anissuer. When you get to the airport and present theseclaims, the staff simply check these claims against the database and let you board the plane. Note also that this boarding pass can be issued by several sources: directly at the check-in counter, or by a ticket agent. Those sources are calledissuers. In software, this set of claims is called asecurity token. Each security token is signed by theissuerthat created it. An app withclaim-base securityrequires the user to authenticate their account, and grants the necessary permissions depending on the claims they hold.
Role-base Security
Besides claims, Identity also gives you Role-base Security
Roles are easy to understand. A user can be added to many roles, and each role gives that user certain permissions
In the next post we’ll dig into the ASP.NET Identity code
See the code here: ASP.NET Identity 2 clone on GitHub