[ASP.NET for Beginner] - Part 4 - CRUD và Data Validation
So you have a basic idea of MVC, how to connect to a database, and you picked a front end that fits — it’s time to get your hands on the 4 most basic operations of any web app: CRUD
See the posts in this series
1. CRUD
CRUD is short for the 4 database-related actions: Create, Read, Update and Delete
This post assumes you use Entity Framework, as covered in part 2, and that the example code is already there. You can clone the code from Github here
1.1. DbContext
In the mvcbasic example, MvcBasicDbContext was already created for you and declared in each Controller that needs it. We’ll use this class
In the PhoneController class already created in the example, you can see all 4 of these methods written out.
1.2. Create
To create a record in the database with Entity Framework, things are very simple
var phone = new Phone
{
    Name = "Samsung Galaxy A5 (2017)"
};

_context.Phones.Add(phone);
_context.SaveChanges();
If you want to add many rows at once, Entity Framework supports another method
var phones = new List<Phone>();

var phone = new Phone
{
    Name = "Phone 1"
};

phones.Add(phone);

phone = new Phone
{
    Name = "Phone 2"
};

phones.Add(phone);

_context.Phones.AddRange(phones);
_context.SaveChanges();
1.3. Read
To get 1 row of data from a table you can use the Find method
var id = 1;
var phone = _context.Phones.Find(id);
The Find method looks in the Phone table for the primary key = your id. It returns null if that key doesn’t exist
To get many rows matching some condition, you can use LINQ to query
var searchKey = "samsung";
var phones = _context.Phones.Where(x => x.Name.Contains(searchKey));
x stands for one Phone object in the database
x.Name.Contains(searchKey) means Name contains the searchKey string
Almost every query you’re familiar with writing in SQL can be written in LINQ form. This is called LINQ to Entities (using Linq to query through Entity Framework’s entities)
You can find the matching Linq statements with the keyword: “How to the action you want using linq”
The result of a query is of type IQueryable. You can keep filtering it, grouping it, filtering again, or converting it into another type like a List, an Array, etc
You can read more about the supported Linq statements here: Supported and Unsupported LINQ Methods (LINQ to Entities) on docs.microsoft.com
1.4. Update
Not as simple as the other statements: updating with Entity Framework is a bit complicated (only a bit)
1.4.1. The Simplest - 2 trip to database
The simplest way to update 1 record has 3 steps: 1. pull that record from the database - database trip 1. 2. change some information in the record. 3. update that record in the database - database trip 2
its code is
// get the phone object from database
var phone = _context.Phones.Find(phoneId);

// change some info
phone.Name = "Test"

// update the change to database
_context.SaveChanges();
As you see, this approach forces you to pull the data from the database before you can edit it
1.4.2. A more complicated
So what if you already know all of the object’s data? In that case querying that record from the database isn’t needed
// Create the object from your brain
var phone = new Phone
{
    Id = 1
};

// Attach it to DbContext, so the DbContext can "track" the object
_context.Phones.Attach(phone);

// Do some change
phone.Name = "Test";

// Save the change
_context.SaveChanges();
1.4.3. Track???
Entity Framework has a very nice (and slightly complicated) way to optimize the data reading/updating methods: it tracks an object’s changes
Say your object has 50 fields. You only change 1 of them, then call _context.SaveChanges(); EF knows only 1 field changed and updates exactly that one field, improving the app’s performance.
To do this, it first queries that object by the primary key, and when you call Attach it starts tracking your object.
When you change a field, that field’s state goes from Unmodified to Modified
1.5. Delete
Like edit, when you want to delete an object you also need “2 trips” to the database
var phone = _context.Phones.Find(id);

_context.Phones.Remove(phone);
_context.SaveChanges();
2. DbContext - A better way to write it
2.1. What if CRUD failed?
There are many cases where calling the crud statements with entity framework adds or changes no rows at all. So how do you know when it succeeded and when it didn’t?
_context.SaveChanges();Luckily the method above returns the number of changed records
So you can check very easily with
// your code here to CRUD
var result = _context.SaveChanges();
by checking “result > 0” you know whether your save changes statement succeeded
2.2. await or not?
In the controller code generated by asp.net you’ll see the statements using _context all have async behind them, await in front, and the method’s return type is Task
Simply put, async - await is a keyword pair that simplifies multi thread programming.
If you haven’t got a solid grip on the async-await technique, I’d suggest… dropping it entirely and only using the methods shown in the code above in this post
3. Model Validation
You have surely heard of constraints like
The name cannot be longer than 20 characters. The phone number must have 10 digitsDo you wonder “how did they do that?”
3.1. DataAnnotation
ASP.NET lets you constrain data through DataAnnotations written above each property
Take the Phone model: I want to add a constraint that the name can’t exceed 50 characters, and to report an error when the user types more than that
namespace mvcbasic.Models
{
using System.ComponentModel.DataAnnotations;
public class Phone
{
public int Id { get; set; }
[]
public string Name { get; set; }
}
}You can dig deeper into writing one shared error message for all properties of the same kind here: Error Message – chung mà riêng
To check whether an object meets the model’s conditions you can use ModelState. For example in the Create method
// POST: Phone/Create
// To protect from overposting attacks, please enable the specific properties you want to bind to, for
// more details see http://go.microsoft.com/fwlink/?LinkId=317598.
[]
[]
public async Task<IActionResult> Create([Bind("Id,Name")] Phone phone)
{
// CHECK MODEL STATE HERE
if (ModelState.IsValid)
{
_context.Add(phone);
await _context.SaveChangesAsync();
var phone2 = new Phone
{
Name = "Test"
};
var phones = new List<Phone>();
_context.Phones.AddRange(phones);
return RedirectToAction(nameof(Index));
}
return View(phone);
}3.2. Client side validation
Client side validation lets users see data errors as they type, before any data is sent to your server
What you have to do is add the following lines to your View code
<!--this line may already be in your View/Shared/_Layout.cshtml file-->
<a href="https://ajax.aspnetcdn.com/ajax/jQuery/jquery-2.2.0.min.js">https://ajax.aspnetcdn.com/ajax/jQuery/jquery-2.2.0.min.js</a>

<a href="https://ajax.aspnetcdn.com/ajax/jquery.validate/1.16.0/jquery.validate.min.js">https://ajax.aspnetcdn.com/ajax/jquery.validate/1.16.0/jquery.validate.min.js</a>
<a href="https://ajax.aspnetcdn.com/ajax/jquery.validation.unobtrusive/3.2.6/jquery.validate.unobtrusive.min.js">https://ajax.aspnetcdn.com/ajax/jquery.validation.unobtrusive/3.2.6/jquery.validate.unobtrusive.min.js</a>
and in the form you add the following code to display the error messages (if any)
<form asp-action="Create">
    <!--this line shows a summary message of all the errors-->
    <div class="text-danger"></div>
    <div class="form-group">


        <!--this line shows the specific error message for the form-->
        <span class="text-danger"></span>
    </div>
    <div class="form-group">

    </div>
</form>
The error shows up like this
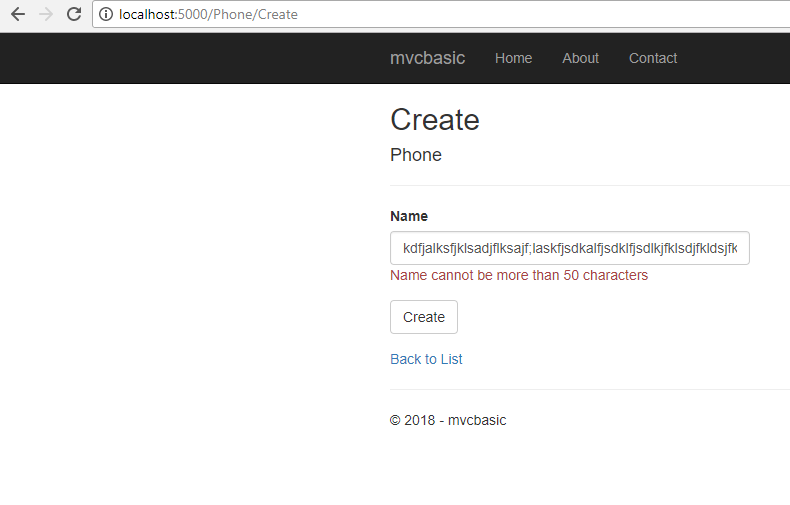
You can see all the annotations here: Data Annotation on docs.microsoft.com
That’s it. Stay tuned for the next part