[Basic for Absolute Beginner] – [Part 4] – Basic Steps for a new app

[Basic for Absolute Beginner] – [Part 1] – Layout with XAML
[Basic for Absolute Beginner] – [Part 2] – Layout with XAML
[Basic for Absolute Beginner] – [Part 3] – App’s Structure and how to customize it
Vậy là bạn đã biết cách bố cục giao diện với XAML, cấu trúc một ứng dụng. Bây giờ, ta sẽ đi tiếp vào phần các bước cơ bản để tạo một ứng dụng mới
Khoan đã, trong 2 part kia, bạn đã tạo kha khá “New Project” rồi phải ko. Bây giờ, bạn sẽ biết tới nó một cách bài bản
Trong cùng series:
[Basic for Absolute Beginner] – [Part 1] – Layout with XAML 1
[Basic for Absolute Beginner] – [Part 2] – Layout with XAML 2
[Basic for Absolute Beginner] – [Part 3] – App’s Structure and how to customize it
[Basic for Absolute Beginner] – [Part 4] – Basic Steps for a new app
[Basic for Absolute Beginner] – [Part 5] – Analytics for your apps
[Basic for Absolute Beginner] - [Part 6] - Source Control
Mục lục
1 Hình thành ý tưởng
Ý tưởng sẽ định hình cho ứng dụng của bạn. Không bao giờ bắt tay vào viết ứng dụng mới khi bạn chưa hề biết ứng dụng của bạn sẽ làm gì
Bí ý tưởng, hãy lên google play store, Apple App Store để học hỏi từ những ứng dụng hay ho trên đó, nhưng đừng sao chép chúng, hãy tận dụng ý tưởng của họ, cải tiến nó, làm nó tốt hơn, bằng cách dưới đây
1.1 Tinh gọt ý tưởng của bạn
Khi đã có ý tưởng rồi, việc tiếp theo bạn làm là sẽ đánh giá ý tưởng đó.
Nghe có vẻ khá buồn cười, nhưng tôi khuyên bạn viết ra giấy câu sau đây:
“[Tên ứng dụng] is the best app of its kind in [chức năng chính], [điểm nổi bật]“
Ví dụ nhé: “Karaoke Online Free is the best app of its kind in singing karaoke on windows phone, it helps people singing at most 2 taps”
Tên ứng dụng: Karaoke Online Free (search trên store, bạn sẽ thấy ứng dụng này có hơn 4000 review, trung bình 4.3 sao)
Chức năng chính: hát karaoke trên điện thoại windows phone
Điểm nổi bật: sử dụng vô cùng đơn giản, chỉ cần 2 chạm là đã có thể hát
1.2 Stick to the plan
Bạn đã có một câu “review” đầy quyền lực mới tạo ra bên trên rồi, hãy bám chặt lấy nó. Giả sử khi làm xong, bạn cần tới 3 chạm, hoặc 4 chạm mới có thể hát được, thì ứng dụng của bạn vẫn chưa hoàn chỉnh.
Điều tệ hại nhất là “tính năng chính” mà ứng dụng bạn cung cấp lại không hoàn hảo. Kế hoạch là hát karaoke trên điện thoại, sau cùng bạn chỉ làm được việc tra cứu bài hát hoặc lời nhạc, thì đây là một ý tưởng fail hoàn toàn, vì ứng dụng bạn viết ra không dành cho mục đích đó.
2 Tạo project
Tạo một Project mới, quá đơn giản rồi phải không?
2.1 Cài đặt các gói Nuget cần thiết
Ứng dụng của bạn sẽ cần 1 số thư viện ngoài, và các thư viện này có thể cài đặt qua Nuget: [Visual Studio] NUGET the Magician
Giới thiệu một số gói Nuget hay ho:
- HTMLAgilityPack: thao tác với chuỗi HTML
- JSON.NET: thao tác với dữ liệu json
- Windows Phone Toolkit: bộ toolkit các control và tiện ích cộng thêm cho ứng dụng
2.2 Tạo các folder chính
Đặt tất các các page bạn sẽ tạo trong một folder tên là PageGroups. Điều này giúp bản quản lý code dễ dàng hơn, dễ dàng chỉnh sửa hơn, và bạn sẽ luôn biết một đoạn code nằm ở đâu. Nếu ứng dụng phức tạp hơn, mỗi một mục nội dung, hãy tạo cho nó một folder trong PageGroups, ví dụ như “LoginGroup”, “SettingGroup”
Đặt tất cả các đoạn code dùng chung trong một thư mục tên là Utilities. Đoạn code dùng chung có thể là một method chuyển đổi đơn vị, một method lấy dữ liệu từ API, chúng có thể gọi từ bất kỳ page nào trong ứng dụng (tất nhiên là những method này “Static”)
Tạo một folder cho Data hoặc Database. Bạn sẽ không muốn để Database ngay bên ngoài Project đâu
Tạo một Folder cho các Data Model, một folder cho CustomControl
Chốt: Tạo folder cho tất cả những thứ bạn thấy có thể gom nhóm lại với nhau. Nên nhớ, trong folder có thể tạo thêm folder khác. Hãy quản lý chúng thật chặt chẽ
2.3 Cần một file cho ViewModel, hay StaticData
Nếu bạn đã biết về MVC, hay MVVM, thì bạn sẽ biết rằng trong các ví dụ, họ thường tạo các class ViewModel ngay trong App.xaml.cs
Vậy thì tại sao ta không tạo hẳn một file chỉ để chứa những class này?
Tạo một file mới tên là “ViewModelInstances” để chứa các ViewModel, và khai báo các ViewModel như cũ
Bạn cũng sẽ cần một file gọi là StaticData, để lưu những dữ liệu trung gian, tồn tại suốt thời gian chạy app
3 Các Page cơ bản phải có
3.1 About
About nói về bạn và ứng dụng của bạn. About page chỉ mất khoản 5 phút để làm, nhưng bạn sẽ có một ứng dụng ấn tượng
Thậm chí, about còn có thể đóng các vai trò sau:
- Nhắc người dùng Rate và Review ứng dụng của bạn
- Cho phép người dùng gửi thư góp ý, hoặc UserVoice
- Thể hiện các change log
- Quảng cáo cho các ứng dụng khác của bạn
3.2 Setting
Setting là page mà người dùng có thể tinh chỉnh một số thiết lập trong ứng dụng của bạn. Page này giúp người dùng có cảm giác như “Điều khiển” được ứng dụng theo cách họ muốn
Nếu ứng dụng của bạn ko có gì để setting cả, thì page này cũng không cần thiết. Nhưng hãy cân nhắc kỹ, các ứng dụng viết vội vàng thường kém chất lượng và không có các tùy chọn
4 Chuẩn bị dữ liệu
4.1 Tạo Model
Model là cấu trúc dữ liệu của bạn. Thường thì công việc này, bạn phải tạo bằng tay.
Tuy nhiên, nếu bạn nhận dữ liệu dạng Json, thì có một các vui hơn để tự động hóa việc này: JsonUtils
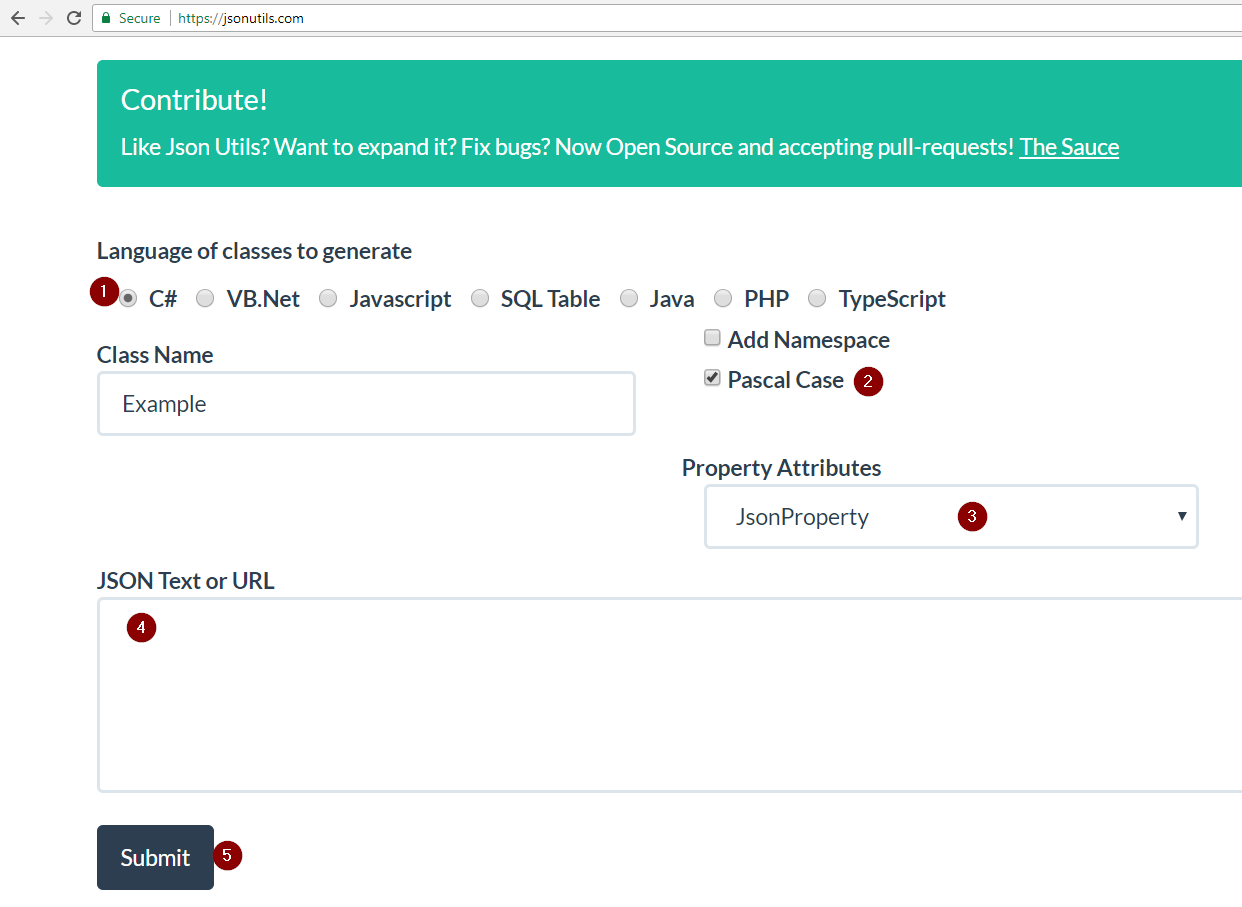
- Chọn ngôn ngữ là C#
- Sử dụng Pascal Case cho tên các thuộc tính
- Dùng Property là JsonProperty
- Paste đoạn data json của bạn vào đây
- Nhấn Submit
Còn nữa, nếu bạn sử dụng cơ chế Binding, bạn sẽ muốn khai báo kế thừa từ Interface INotifyPropertyChanged
Và bộ công cụ Resharper sẽ giúp ích cho bạn
Đọc thêm về Resharper ở đây: [Windows Phone – Silverlight] Layout with XAML – Basic for Absolute Beginner – Part 2, phần 2.1
4.2 Load Data ở đâu trong code behind?
Load data là việc bắt buộc phải làm. Nhưng load data ở đâu? Nếu đặt nhầm chỗ, ứng dụng của bạn sẽ chậm phản hồi tới người dùng, và sẽ bị bad review
Và có hẳn một bài blog viết về nó: [Windows Phone] Where to put load data method?
Thế là xong rồi, hãy dùng kiến thức bạn có trong bài Layout with XAML để bắt đầu thiết kế và tạo nên ứng dụng Windows Phone thực sự đầu tiên của bạn
Chúc vui ;)