[ASP.NET] Mở rộng EditorFor
You are probably very familiar with the EditorFor control, but it only renders for the data types it supports. What do you do if you want to extend EditorFor to render your own data types?
Table of contents
You could say EditorFor and EditorForModel are the most useful controls, since they can render all the input tags you need in one shot based on one of your models.
1. Using EditorFor and EditorForModel
Why doesn’t anyone talk about Editor: since MVC2, the Editor control that shipped with the first MVC version can be replaced by EditorFor. The word “For” means this is a strongly typed html helper, that is, you can pick the property name from the model without getting it wrong
Model (or ViewModel)
To render a form you have to know what data it takes in. To display that data you have to create a class with Properties
Model
public class Lesson
{
// ScaffoldColumn mark that EditorFor should render it or not
[]
public int Id { get; set; }
// To display as label
[]
public string Name { get; set; }
[]
public int CDNumber { get; set; }
[]
public int CDTrack { get; set; }
}ViewModel
public class LessonViewModel
{
    public Lesson LessonItem { get; set; }
}
View
- The EditorFor control has to sit inside a form tag
- Razor lets you render that form tag automatically
@model LessonViewModel

@using(Html.BeginForm("ActionName","ControllerName", FormMethod.Post,new {@class = "myformclass"}))
{
    @Html.EditorFor(x => x.LessonItem)
}
If you have no ViewModel but want to render straight from the Lesson model
@model Lesson

@using(Html.BeginForm("ActionName","ControllerName", FormMethod.Post,new {@class = "myformclass"}))
{
    @Html.EditorForModel()
}
2. Extending EditorFor
Create a new class to hold the data
public class TextBoxWithCheck
{
[]
public string MyText { get; set;}
public bool IsTrue { get; set; }
}Add this new class to the Lesson model
public TextBoxWithCheck FancyBox { get; set; }Now, if you want a textbox with a checkbox attached like this
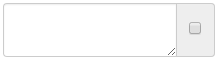
Clearly no default control can pull off this trick, and EditorFor doesn’t know what to pick to render the “FancyBox” property of type “TextBoxWithCheck”.
So you are going to teach it how to render.
2.1 Creating EditorTemplates
- Create an “EditorTemplates” folder in Views > Shared
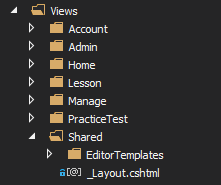
- Add a new View to that folder, named “TextBoxWithCheck.cshtml” (it has to match the custom class name)
@model TextBoxWithCheck

@Html.LabelFor(x => x.MyText)
<div class="input-group">
    @Html.TextAreaFor(x => x.Answer, new {@class="form-control"})
    <span class="input-group-addon">
        @Html.CheckBoxFor(x => x.IsTrue)
    </span>
</div>
That’s it. Now EditorFor knows how to render every instance of TextBoxWithCheck.
Easy, isn’t it?